Saturday, January 29, 2011

Grilled Burgers with the Stufz Burger Press

I was fortunate enough to receive the Stufz Burger Press as a Christmas present.  This product makes great stuffed burgers that are very easy to assemble.  Here's the Stufz in action.

We're stuffing burgers with Bacon, Sauteed Mushrooms and Cheddar Cheese
The Stufz has two plungers.  The wider one makes perfect patties and also seals the top layer for stuffed burgers.  The narrower, inner plunger makes the perfect pocket for all the goodies one could stuff in a burger.  The possibilities are endless!

The perfectly formed pocket, ready for stuffing!

Cheese, Bacon, and Mushrooms...Mmmm!

The finished burger sealed up and ready for the grill!
Grilling away on the Yoder!
The burgers grilled up great on the Yoder pellet cooker.  I've had a lot of questions as of late concerning the Yoder YS640's ability to grill.  As you can see from the picture above, yes it can grill.

Here's the finished product, ready for consumption.

Now that's a burger!

In conclusion, I was very pleased with the Stufz Burger Press.  Assembly of the stuffed burgers was incredibly easy with this product.  The Stufz makes a great seal that keeps all the goodies inside the burger while it's cooking and clean up is a cinch as well.  It's also a self-contained unit so there aren't multiple pieces to lose.  I highly recommend this if you're looking to add some variety to a bland old burger. 

Saturday, January 22, 2011

Smoked Cheese with the A-Maze-N-Smoker

I've had the A-Maze-N-Smoker on my radar for some time now so I could add cold smoking to my repertoire. For those of you who aren't familiar with the A-Maze-N-Smoker, it is simply a maze, manufactured out of perforated metal, that is filled with sawdust.  Once lighted, it gives off excellent smoke without adding any significant amount of heat.

The unit comes in two sizes.  A 6" x 6" unit and a 6" x 8" unit.  I received the 6" x 8" variety for a Christmas present and thought I would finally get around to cold smoking some cheese.  I cut up some blocks of medium cheddar and pepper jack cheeses into some smaller chunks and threw them on my Yoder Smokers pellet grill (turned off of course).  Then I filled up the A-Maze-N-Smoker half full with some of the hickory sawdust that came with the product, and lit one side of the sawdust to start the smoking.  Here's what it looked like.

Starting off the smoke.

Over half way done.  This was a little over 3 hours after lighting!

Almost done.  The cheese smoked for 6 hours!

Once the cheese was done smoking, it is very important to wrap the cheese tightly in plastic wrap or vacuum seal if you have one.  Let that cheese rest in the fridge for a week or more to let the smoke flavor mellow.

The A-Maze-N-Smoker is a very well built unit and simple to get a good, consistent smoke going.  If you're into smoked cheese or any other cold smoked product, I would highly recommend it.

Saturday, January 15, 2011

More Brisket and Burnt Ends

For my first brisket of 2011, I got a hold of a nice 14lb packer brisket to smoke up.  This round of brisket was the most tender (almost too tender) I've smoked yet.  The burnt ends that I made from the point were some of the best I've had.  Here's the process for this incredible batch of meat.

  • The night before the smoke trim the top top of the brisket of any extra fat.  Leave the bottom with the fat cap mostly intact.  Then give the meat a good rub down with your favorite BBQ rub.  I used John Henry's Texas Brisket rub.
  • Now it's time for some smoke.  I fired up my Yoder Smokers pellet grill to 225 degrees and threw the meat on, fat cap up.  The time was around 10pm
  • Leave the meat on the smoker until it reaches 140 degrees internal temp, measured at around the center of the flat.  Time was around 3am.
  • Now it's time to foil.  Transfer the meat to either a foil pan or a double layer of aluminum foil, with the fat cap down.  Add to this around a cup or so of beef broth.  Seal the pan with foil.  I finished cooking the meat until it reached an internal temp of 205.  Time was around 2pm.  Around 16 hours of cooking time!  As usual, the Yoder pellet grill held a consistent temperature over the entire cook.  The consistency of the Yoder allows me to get some good periods of rest while I'm doing these overnight cooks.

Now it's time to fix up some burnt ends.  Once the brisket is done, remove the point from the flat.  Keep the flat wrapped in foil and return it to a cooler lined with some towels to rest, at least a couple of hours.  Cube the point into some some small, bite size chunks and transfer to a foil pan.  Give those chunks of meat a good sprinkling of  some rub and smoke them for around 1.5-2 hours at 225, until they are slightly dried out.  Then give those burnt ends a good helping of some BBQ Sauce.  I used Pappy's BBQ this time around and that made some great burnt ends.  I don't think I'd do them any other way again.  Leave the pan of sauced burnt ends on the smoker for another 1-1.5 hours.  Here's how everything looked when it was done.

The sliced flat, ready for consumption!
The burnt ends.  Smoky and flavorful!  Some real meat candy!

Sunday, January 2, 2011

Smoked Sausage Chipotle Queso

This year for New Year's Eve we did a variety of dips for our party.  My responsibility was the cheese dip, so I put my spin on the old classic.  Instead of frying the sausage, I smoked a log of it.  Instead of Rotel, I used diced chipotle peppers in adobo.  Here's how it all went together.

The day before, I fired my Yoder Smokers pellet grill to 225 degrees with some BBQr's Delight Oak/Apple pellets.  Once the temperature was locked in, I threw on a chub of Jimmy Dean Sausage and smoked it until it was 170 degrees internal.

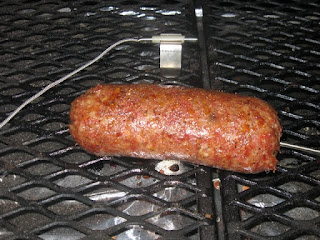
The sausage smokin' away!

The Yoder temperature control is spot on.

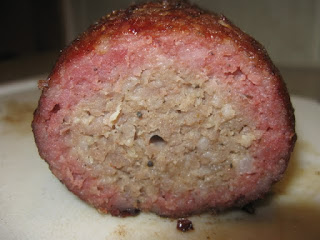
Smoked sausage.  Check out that smoke ring!

To assemble the dip, combine 16 oz. of Velveeta, cubed in a crock pot with a 16 oz. container of sour cream.  Add to that, 2 Tablespoons of diced chipotle peppers in adobo and the smoked sausage, crumbled.  This made a nice medium level of heat, so if you like it more or less spicy, adjust the amount of chipotles.  Let all that melt together in the crockpot on low heat.  Here's what it looks like on a bed of chips.

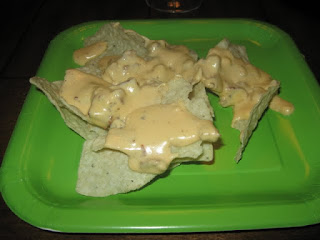
Check out all the rich, cheesy, smoky deliciousness!

This recipe was an excellent deviation from the normal Velveeta/Ro-Tel dip.  Serve this up at the next big party and you'll have hit on your hands!